Sunday, December 31, 2017

The Classic Piano Course (Part 3)
At this time, I have been learning the piano for about 2 months. As more and more concepts are covered, the more difficult the pieces become, due to the pieces implementing more types of notes/techniques (Some I went over include Staccatos, first and second endings, whole and half-steps). Carol Barratt also states in her book "Now that the pieces are gradually getting more difficult, don't expect instant achievement! Make sure you practice hands separately until perfect before attempting hands together." In my experience, you can get the gist of it within 1-2 hours of a "difficult' piece with practice and just running it through, but in order to play it perfectly every single time, it does take a week or two, as stated in the book.
Although I haven't gotten to the barriers of not having a full-sized keyboard yet, there has been some other limitations, such as not being able to play a duet piece or using the sustain pedal, as my keyboard doesn't have one.

Another challenge I have faced is extending my hands. Since playing the piano is mostly muscle memory, when you are required to "extend your hands," your entire hand may move according to the note. For example, you may have to the note "A" on your right hand, then have to play the same note an octave higher, which forces you to move your hand positioned, so one key is not assigned to one finger like before. This is difficult for me because it requires more practice, and is hard to play the correct notes in the correct rhythm while making sure your right hand is also playing correctly.

Another key point is playing sharps and flats, as mentioned in previous posts. The key signature may tell you that all the "B's" in the piece are flats. This means that you need to play the black key to the upper left of the actual B key. This is challenging because it puts your hands in awkward positions.

How much progress do you think you have made since the beginning of quarter 2?
Although I haven't gotten to the barriers of not having a full-sized keyboard yet, there has been some other limitations, such as not being able to play a duet piece or using the sustain pedal, as my keyboard doesn't have one.

Another challenge I have faced is extending my hands. Since playing the piano is mostly muscle memory, when you are required to "extend your hands," your entire hand may move according to the note. For example, you may have to the note "A" on your right hand, then have to play the same note an octave higher, which forces you to move your hand positioned, so one key is not assigned to one finger like before. This is difficult for me because it requires more practice, and is hard to play the correct notes in the correct rhythm while making sure your right hand is also playing correctly.

Another key point is playing sharps and flats, as mentioned in previous posts. The key signature may tell you that all the "B's" in the piece are flats. This means that you need to play the black key to the upper left of the actual B key. This is challenging because it puts your hands in awkward positions.

How much progress do you think you have made since the beginning of quarter 2?
Snowboarding blogpost 2

Blog post 2
For my second blog post I am going to focus on how to draw a persons whole body and not just a persons head. In the book it says that one good way to get better at drawing a whole body is, instead of focusing on a whole body you should focus on the shapes that make the body. Such as your head as an oval.

Japanese Kanji Part 3
Welcome back! This is the continuation and 3rd blog post of Japanese Kanji.
For this lesson, we will be talking the kanji 雨,雪, and 雷.
 The first kanji, 雨 (ame), is the basic kanji for rain. When looking at the kanji, it looks similar to a window pane with rain droplets pouring down. This kanji generally takes this pronunciation, as it almost always tends to be this meaning by its own.
 The next kanji, 雪 (yuki), is a combination of two kanjis we have gone over. The top kanji, 雨, is for rain, and the bottom kanji is similar to a turned on its side 山, the kanji for mountain. Typically on mountains, cold precipitation usually leads to snowy weather, which is exactly what this kanji means! Together, 雪 means snow.
The final kanji is 雷 (kaminari). This kanji is also a combination of two kanji we've learned, being both 雨 and 田. As 田 (da) means rice field, and 雨 (ame) is rain, these kanji when put together means electricity. It would be explain as power (similar to the kanji 男) runs through the rice field with rain like qualities, and that electricity would be formed.

For this lesson, we will be talking the kanji 雨,雪, and 雷.
 The first kanji, 雨 (ame), is the basic kanji for rain. When looking at the kanji, it looks similar to a window pane with rain droplets pouring down. This kanji generally takes this pronunciation, as it almost always tends to be this meaning by its own.
 The next kanji, 雪 (yuki), is a combination of two kanjis we have gone over. The top kanji, 雨, is for rain, and the bottom kanji is similar to a turned on its side 山, the kanji for mountain. Typically on mountains, cold precipitation usually leads to snowy weather, which is exactly what this kanji means! Together, 雪 means snow.
The final kanji is 雷 (kaminari). This kanji is also a combination of two kanji we've learned, being both 雨 and 田. As 田 (da) means rice field, and 雨 (ame) is rain, these kanji when put together means electricity. It would be explain as power (similar to the kanji 男) runs through the rice field with rain like qualities, and that electricity would be formed.

With Japanese, as vocabulary grows, we see that many symbols and kanji can be put together and can form complex meanings. Although they can be intimidating at first, breaking them down can help them be understood better. Within the book, "Read and Write Japanese Scripts," on page 104, it explains kanji like 雨, are "simpler" kanji, and are typically used to create "complex kanji's."
If you're learning a language or know a language, how do you break it down for your best learning?
Thanks for reading, I hope these posts can be helpful into your potential journey in learning another language. さよなら! (Goodbye!)
Japanese Cooking 2: Electric Boogaloo
This Japanese dish is a simple one. It’s “The Japanese
equivalent of a sandwich…” (Suzuki 132). These savory rice balls, or onigiri san-shu, can consist of nearly
anything you want them to, which is part of the great appeal. It can go with many types of meals, as "...rice is the best complement to Japanese dishes" (Suzuki 9).
You start off with anywhere from 6-10 cups of cooked rice
(about three cups uncooked).

Then, you take a handful of rice, in which the amount of
rice varies slightly depending on the shape of rice ball you make (the triangle
and round types take slightly less rice than the barrel shape).
For each rice ball type, you start by putting that handful
of rice from the previous step in a small round bowl. Then, you make a small
indent in the middle to put some of whatever you want in it. This can be tuna,
salmon, or whatever, but it’s better if it is a savory ingredient.
Next, you want to bring the sides of the rice in so the rice
is in the shape of a rough ball.
This is where it can vary, depending on the type of rice
ball you want to make.
For a triangular ball, you bend cup one hand to form a
triangle base, and bend the other hand at the knuckles, pressing the rice into
shape. Turn the rice until it is in the desired triangle shape.


For a regular round rice ball, just roll the rice around in
the palm of your hand.
For a barrel rice ball, cup one hand to hold the rice. Cupping
the other hand, press both ends of the barrel while turning and rolling it into
shape, while gradually increasing pressure. It is very common to wrap a piece
of seaweed around the rice barrels.


Lastly, heat up a frying pan and wipe the surface with a
small amount of oil. Brown the sides of the rice balls, then take them out of
the pan. At this point you can choose to brush them with a sauce, such as shoyu
or soy sauce, or just eat them as is.
Taste: I had my rice balls with a little bit of tuna on the
inside. It was very delicious, just a normal rice and tuna taste. Great if you
love seafood.
This session of cooking really helped me with free-styling
the ingredients I put into food! I got to experiment, and I tried soy sauce and
tuna, as well as some other combinations.
For a fun question, what is everyone’s weird variation of a
popular food? It could be a weird sandwich, or anything.
Blog 2: Healthier Eating for the Month of December
Hello, fellow bloggers, and welcome to the second installment of my blog. I had intended to do 2 blogs for the month of December so that I didn't have to do one mega-post, but life tends to get in the way of ideas such as that. Thus, I present my diet for the month of December, and a few recommendations.

 As you may have seen from my table, I consumed quite a bit of Bell Peppers during the month of December. Although this will be more of a personal thing, I thought to show it off anyways due to the numerous health benefits that it has. Anyways, let's discuss the health benefits of these peppers. The previously mentioned Jonny Bowden states "Nutritionally, peppers are an excellent source of vitamins C and A (beta-carotene) and the mineral potassium. They also contain vitamin K, which is increasing being recognized as a vitally important component of bone health." (Bowden 60). Additionally, he goes on to state "Peppers are low in calories and a well-kept secret as a snack food. They blend in with everything." (Bowden 61). Personally, the crunchiness and savoriness of bell peppers make them a well suited item to snack on. Also, I personally find that bell peppers are made better as a snack when your realize the health benefits of them, containing many vitamins to improve your overall health. And while ranch may not be the healthiest thing around (something commonly used in conjunction with bell peppers,) the enjoyment of bell peppers can be viewed by enjoying them as a complement to other healthy foods without the use of ranch (the author recommends eating them with apples and string cheese.)

In the chart that is seen directly on the right, 2 food items listed in the previously mentioned book that I ate that day were recorded in the "Food A," and "Food B," columns, while Tea and Eggs were recorded in the "Food C," and "Food D," columns respectively. (This was done mostly because those were the two most reoccurring items on my original list, which was much less organized.) In addition to this list, some selected foods will be highlighted below.
Highlight - Clams
During the first week or so of December, me and my Father went out towards the coast and went digging for clams. While we only managed to dig up a few, I can still confidently say that the clams were among one of the best meals I've ever had in my life. The clams were sauteed in olive oil, butter, and garlic, and the before and after product of the clams can be seen below.
 |
| Clams before being sauteed |
 |
| Clams after being sauteed |
According to Jonny Bowden, the author of my IRP book, "Clams are on of the richest sources of iron on the planet, containing many times the amount found in beef liver. And 3 ounces (85 g) of clams provides a whopping 700 percent of the Daily value for vitamin B12, plus 66 percent of the Daily Value for iron." (Bowden 241). In addition to the large amount of necessary daily iron being consumed, it also contains a large amount of the vitamin B12, a vitamin that helps with nerves and the health of blood cells. Mollusks (the family in which clams fall into,) also tend to be low in fat, and rich in a host of minerals, including things such as zinc and copper. Also, in my personal opinion, the taste, and especially the texture of clams is quite an enjoyable meal. I would recommend complementing the dish with a grain such as rice, and a vegetable that you tend to enjoy (in my case, green beans.) If you have the opportunity to go clamming, I highly recommend you try this food out.
Highlight - Bell Peppers

 As you may have seen from my table, I consumed quite a bit of Bell Peppers during the month of December. Although this will be more of a personal thing, I thought to show it off anyways due to the numerous health benefits that it has. Anyways, let's discuss the health benefits of these peppers. The previously mentioned Jonny Bowden states "Nutritionally, peppers are an excellent source of vitamins C and A (beta-carotene) and the mineral potassium. They also contain vitamin K, which is increasing being recognized as a vitally important component of bone health." (Bowden 60). Additionally, he goes on to state "Peppers are low in calories and a well-kept secret as a snack food. They blend in with everything." (Bowden 61). Personally, the crunchiness and savoriness of bell peppers make them a well suited item to snack on. Also, I personally find that bell peppers are made better as a snack when your realize the health benefits of them, containing many vitamins to improve your overall health. And while ranch may not be the healthiest thing around (something commonly used in conjunction with bell peppers,) the enjoyment of bell peppers can be viewed by enjoying them as a complement to other healthy foods without the use of ranch (the author recommends eating them with apples and string cheese.)
Welcome to the end of this blog, and be sure to comment below if any of my recommendations have piqued your interest. Additionally, I can take requests to highlight any of the foods recorded on my table above that you might find interesting, and explain their health benefits, and interesting ways to prepare them. As always, questions are nice too, and be sure to tune in soon where I document whether or not my change in diet has affected my health or not.
Japanese Kanji Part 2
Hello there everyone! I hope your winter break has been going very well. As we tie in the very end of the year, and as things begin to slow down, I thought it would be a good idea to have a two part back to back lesson about more kanji!
For this lesson, we will be going over the kanji 山, and 田.
The first kanji, 山 (yama), is one that can be placed in many kanjis, to create a combination of words or meaning. This kanji on a basic level, means mountain. Learning this kanji and seeing when it can be used is very helpful for finding the context of certain kanji! An example of this is the kanji 出, which is two of the 山 character. From closer inspection, seeing two means to go out, or to leave an area, like going to see the mountains!

The next kanji, 田 (ta), is one that just like 山, means rice field, or rice patty, and when used in joint circumstances, can create new words! 男, which has the 田 kanji at the top, also has the power kanji, 力, at the bottom. Put together, this is the kanji for the word man, and in futile Japan, men's main role would've been taking care of rice fields for agriculture/survival.
Here are the stroke order for both kanjis.

For this lesson, we will be going over the kanji 山, and 田.
The first kanji, 山 (yama), is one that can be placed in many kanjis, to create a combination of words or meaning. This kanji on a basic level, means mountain. Learning this kanji and seeing when it can be used is very helpful for finding the context of certain kanji! An example of this is the kanji 出, which is two of the 山 character. From closer inspection, seeing two means to go out, or to leave an area, like going to see the mountains!

The next kanji, 田 (ta), is one that just like 山, means rice field, or rice patty, and when used in joint circumstances, can create new words! 男, which has the 田 kanji at the top, also has the power kanji, 力, at the bottom. Put together, this is the kanji for the word man, and in futile Japan, men's main role would've been taking care of rice fields for agriculture/survival.
Here are the stroke order for both kanjis.

Unit 1 within the book, "Read and Write Japanese Scripts," goes over many basic and natural kanji that tend to be placed either in complex kanji or directly next to other kanji, to give natural or unnatural meanings, leaning more towards feelings or assumptions of how the natural kanji can impact the contextual meaning.
With knowing these two kanji, we can now use them to see when they come up in other kanji, and decipher what they mean! In the next blogpost, I will use a kanji that uses 山 and 田 to explain a further meaning.
The Way to become an Pianist Part 3: Getting to know Your Scales
In the book of How to play Popular Piano in 10 easy lessons, by Norman Monath, so far I had gone over chords and melodies in the past blogs. Now I'm introducing scales, the scale is simply an ascending or descending sequence of notes that progresses according to a particular formula... The formula would be every note is a whole-note apart(Whole-Tone scale) or half-tone apart (Chromatic scale) (Monath 56). As you could see below, are the images show what different kind of formula there are.


Furthermore, scale has 2 type, a major and a minor, but to start off, the author suggest to play the major scales at first. The author also noted a tip or a formula, "The formula for major scale is based on these intervals: 1, 1, 1/2, 1, 1, 1, 1/2. No matter which key of the piano you start on, if you use that formula the result will be a major scale" (Monath 57). The 1 are whole step note, (White to White key that have black key in between them) and 1/2 (White next to another white key). After realized and applied the formula to my practices and using my knowledge as a violinist, the major scales aren't so bad, since I already know the placement of notes on the keyboard. The practice made me a better musician overall, by training my ear to get in-tunes of notes, so if I need to hit the notes on my violin, I can hit the correct note. Not only that, its help me learning the new formula and how it works and creates a simpler way to play the keyboard with scales.


 Do you all find playing basic major scales in general on musical instrument easy? If not, what is the obstacles? For me as violinist, starting on C Major is pretty simple, but as it start going up to like three or more sharps, it's get more difficult on the violin, however not so much on piano!


Furthermore, scale has 2 type, a major and a minor, but to start off, the author suggest to play the major scales at first. The author also noted a tip or a formula, "The formula for major scale is based on these intervals: 1, 1, 1/2, 1, 1, 1, 1/2. No matter which key of the piano you start on, if you use that formula the result will be a major scale" (Monath 57). The 1 are whole step note, (White to White key that have black key in between them) and 1/2 (White next to another white key). After realized and applied the formula to my practices and using my knowledge as a violinist, the major scales aren't so bad, since I already know the placement of notes on the keyboard. The practice made me a better musician overall, by training my ear to get in-tunes of notes, so if I need to hit the notes on my violin, I can hit the correct note. Not only that, its help me learning the new formula and how it works and creates a simpler way to play the keyboard with scales.


This was a picture that I took last week at the park. I decided that I wanted to try and do nature photography again but this time focus more on the lighting of the picture. The book I used for my information on lighting was called Photography by Barbra London.
To take this photo I used advice and tips given to be from the book. The book stated, " The sun is a great source of lighting and actually is the best source of lighting which many people fail to realize. Here are some things to remember when using the sun as your only source of lighting.
1. You should avoid having the sunlight come directly from the side, use an angle up
2. Avoid having the sun behind you
3. Keep the in front of you and behind the subject
4. Measure the golden hour for the best quality pictures
(Photography 44, London)."
This information was very helpful when taking this picture. I used the 3 tips given except for the last one because I wanted this picture to be more dark colors rather than gold and bright. I angled my camera upward only capturing the branches of the trees and I used the sky and the clouds as a background for my picture which helped add a little color but still kept the trees as the main focus of the picture. I had to move my camera and adjust my angles many different times in order to get the purple to shine on the side of the picture. This was overall a good picture to me and I enjoyed taking it because I learnt a lot more about lighting and the sunshine and how to properly use the sun for lighting.
Shoes
The correct type of shoes are important because you are supposed to have the proper shoes to run correctly. It is important that you have running shoes which are shown on the right and not other types of shoes that have no support for running shown on the left. Running shoes are made for the purpose of running because they are designed and manufactured to meet the demand of bearing three to four times the body's weight on impact. Running shoes should be worn while running to prevent damage to the shoes and to your body. For example if you don't have the proper shoes for basketball and play in vans then you could end up injuring your ankle because it does not have the right amount of support for the activity. This also goes for track if you run with shoes that are not made for running then it could mess up your performance and could lead to injuries. Overall make sure you wear the right shoes for the proper sport or activity.


Bad Example Good Example
Understanding the Piano #2: Pedals
Piano Pedals
 |
| My Piano Pedals |
Along with the 88 black and white keys on the piano, pedals are another major component that you will find on any piano. They are foot-operated levers that change the instrument's sound in various ways. This allows a musician to provide more variety in his or her playing by making the music more dynamic and interesting.
To the far left, you have the soft pedal. This pedal "shifts the entire set of 88 keys and hammers ever-so-slightly to the right. This shift causes the hammers to strike a key's string, or set of strings, in a different spot and create a softer sound" (Neely 34).
In the middle there is a third pedal creatively named the middle pedal. It allows you to "sustain a specific note, or group of notes, while you continue playing other notes normally." On some upright pianos though, the pedal has an entirely different function. It "inserts a layer of felt between the hammers and strings to make the sound much softer and more muffled" (Neely 34).
 |
| Electric Keyboard Pedal |
Electric Keyboard Pedals
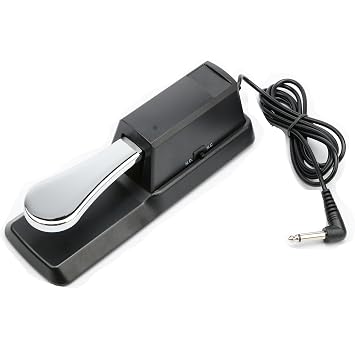
Electric keyboard pedals are slightly different from a regular piano because they "don't move any dampers or shift any keys because there are no real strings inside an electric keyboard" (Neely 34). The most common electric keyboard pedals, though, are the sustain pedal (which does the same thing as the one on an acoustic piano) and a volume pedal that makes your music softer and louder. Most keyboards come with one or the other.Overall
Remembering which pedal was which was relatively easy after I played around with them for a bit although currently I have little use for them, Still, with this information I now know how to incorporate them into my playing in the future, which will be relatively easy since I will already be accustomed to them.Does this information make learning the piano any more of an intimidating task for you by any means? If so, how much harder?
Neely, Blake. Piano for Dummies. New York: IDG Books Worldwide, 2009, Print.
Stretching/ Warm-up
Stretching and warming up is the most important thing of track and any other sport. It is important that you are properly warmed up so you don't get injured from cold muscles. Also so you are warmed up so you can perform at your best ability. The stretch that I am doing is called the Knee to chest stretch, this stretch is important because it is focusing on stretching the hamstring. It is important form all muscles to be stretched out and extra important for the hamstring because it is a big important muscle the requires proper care. The hamstrings are among the muscles that are responsible for running fast. The hamstrings are involved in 2 very important running motions one which is knee flexion and the other which is hip extension. Without the hamstrings for example if you pull a hamstring you will not be able to run and not even walk in some extreme cases. Overall it is very important that you warm up before each workout also stretch after workouts to keep muscles loose and prevent all injuries.


Sonic Generations Speedrunning: City Escape
Sonic Generations Speedrunning
Even without taking any shortcuts, the first attempt was a bit challenging, but manageable. There are a lot more platforming sections in the bottom section, which means I had to slow down in order to make precise jumps onto platforms. Additionally, there was once instance in particular where the stage tried to push Sonic to the higher level, so I had to pay attention to prevent that from happening. In the end, I finished the stage with a time of 2 minutes 57.62 seconds.
In the second attempt, I ran through the stage once more using the alternate paths mentioned in the book, same as always. Like in Chemical Plant, the first shortcut ended up being the most difficult one to perform. The book states that "As you approach the next left turn [:32 mark], steer toward the left side to find the edge of a rail. Jump and land on the rail to begin grinding. Stay on this rail and it will carry you to a street one level above which ends with three Trick Jump Panels" (Birlew 108).
I wish I were exaggerating when I say this, but trying to get this right took almost three hours long. The problem is when Sonic goes off the Trick Jump Panels on the top level, he is supposed to land and grind on a power cable in the air. Unfortunately, the chance of landing on the rail seems to be completely random. Sonic would either shoot over the rail, or fall short of it. Sometimes he would land on the rail, but the times that this did happen were extremely rare. It's because of this, that I did what I thought I would never do. I decided to give up on trying to use the first shortcut.
Thankfully, the alternate paths from here on out were much easier to go through, so the rest of the speedrun progressed through without any major issues.
At the :44 mark in the video, there is a big ramp near the bottom of the hill. Using the ramp propelled Sonic onto a power cable at the :46 mark, where I had to "Grind on this cable all the way through a shortcut to the steep drop of a high hill" (Birlew 109). Doing this allowed me to save a couple of seconds by skipping more turning sections.
The next alternate path taken was at the 1:00 mark. "For the shortcut, you must jump and hit the Mono Beatle with a Homing Attack. Immediately hit the Mono Beetle with a Homing Attack, and then Boost midair to hit the Dash Rings on the right" (Birlew 110). By doing this, Sonic was flung over the bridge and for a split second had an opportunity to Homing Attack more Mono Beetles at the 1:03 mark. "Afterward, Boost to the right to hit Dash Rings that put Sonic on scaffolding [1:05 mark], ending in a Trick Jump Panel" (Birlew 110). Doing all these steps was a bit tricky. While I had no problem performing the first set of Homing Attacks, doing the ones past the bridge was a little difficult, as there's only an extremely brief window of time where Sonic can homing attack the enemies in the air. If performed too late, Sonic while target the enemies on the ground instead.
The third shortcut I took required me to take the high ground once again. At the 1:16 mark, "Another Dash [Correction: Rainbow] Ring hangs suspended just off the edge of the hilltop, and this leads to a shortcut over the next treacherous area. The shortcut requires you to Homing Attack three Mono Beetles [1:18 mark] in a row in order to get past without falling, anyhow" (Birlew 110). This alternate path took a few attempts to get right. Thanks to Sonic's quick momentum, I would either run underneath the Rainbow Ring, or miss it by jumping to the side of it. Either way, it wasn't too difficult to get correctly, unlike the first shortcut.
Taking the previous shortcut led Sonic into a park. Exiting the park leads to the next path into a 2D section. "Hitting a Jump Panel [1:34 mark], Sonic flies right onto a Horizontal Bar across the street" (Birlew 111). The Horizontal Bar allowed me to swing Sonic onto the higher path where I was able to skip the lengthy platforming section on the bottom path. After going through Dash Rings, I was required to "Jump immediately and Homing Attack balloons hanging midair and bounce from the resulting pop . . ." (Birlew 111). I was barely able to achieve this, as instead of Homing Attacking the balloon, Sonic sort of crashed through them at the 1:39 mark due to his high momentum. However, the end result was still the same as what the book stated, so it all worked out in the end.
The last set of shortcuts I performed were at the 1:41 mark, and the 1:51 mark. The first of the three required me to "Jump and Homing Attack two Mono Beetles in succession,and then spin dash after the second to reach a rooftop. From there, you can jump to a balcony on the next building, which has a Jump Panel at the right end [occurred at the 1:45 mark]" (Birlew 112). The Jump Panel was able to propel Sonic into another Horizontal Bar, which led to the second shortcut I mentioned earlier. This shortcut occurs after a small platforming section, where I had to "Spin Jump onto the grind rail while midair. Jump before reaching the end of the first rail and spin jump onto the next . . ." (Birlew 112).
After the last shortcut, I did make a little mistake at the 1:59 mark where I ended up boosting into the wall instead of through the small opening, but it didn't severely impact my time. The final section of the stage is a set piece where Sonic is being chased by a truck, so there are no more shortcuts. My ending time for the stage was 2 minutes 35.15 seconds. So taking most of the shortcuts that the book mentioned saved a total of 22.47 seconds.
 Stage: Modern City Escape


For my third blog post, I'm going to speedrun City Escape. This is one of my favorite stages in the game, mostly due to the amazing music playing in the background. However, I am a bit cautious going in, as if the last blog taught me anything, going through the stage on the second attempt might be a very difficult time.
Attempt #1
Even without taking any shortcuts, the first attempt was a bit challenging, but manageable. There are a lot more platforming sections in the bottom section, which means I had to slow down in order to make precise jumps onto platforms. Additionally, there was once instance in particular where the stage tried to push Sonic to the higher level, so I had to pay attention to prevent that from happening. In the end, I finished the stage with a time of 2 minutes 57.62 seconds.
Attempt #2

 |
| Left rail and higher street level |
 |
| Power line |
Thankfully, the alternate paths from here on out were much easier to go through, so the rest of the speedrun progressed through without any major issues.
At the :44 mark in the video, there is a big ramp near the bottom of the hill. Using the ramp propelled Sonic onto a power cable at the :46 mark, where I had to "Grind on this cable all the way through a shortcut to the steep drop of a high hill" (Birlew 109). Doing this allowed me to save a couple of seconds by skipping more turning sections.
The next alternate path taken was at the 1:00 mark. "For the shortcut, you must jump and hit the Mono Beatle with a Homing Attack. Immediately hit the Mono Beetle with a Homing Attack, and then Boost midair to hit the Dash Rings on the right" (Birlew 110). By doing this, Sonic was flung over the bridge and for a split second had an opportunity to Homing Attack more Mono Beetles at the 1:03 mark. "Afterward, Boost to the right to hit Dash Rings that put Sonic on scaffolding [1:05 mark], ending in a Trick Jump Panel" (Birlew 110). Doing all these steps was a bit tricky. While I had no problem performing the first set of Homing Attacks, doing the ones past the bridge was a little difficult, as there's only an extremely brief window of time where Sonic can homing attack the enemies in the air. If performed too late, Sonic while target the enemies on the ground instead.
The third shortcut I took required me to take the high ground once again. At the 1:16 mark, "Another Dash [Correction: Rainbow] Ring hangs suspended just off the edge of the hilltop, and this leads to a shortcut over the next treacherous area. The shortcut requires you to Homing Attack three Mono Beetles [1:18 mark] in a row in order to get past without falling, anyhow" (Birlew 110). This alternate path took a few attempts to get right. Thanks to Sonic's quick momentum, I would either run underneath the Rainbow Ring, or miss it by jumping to the side of it. Either way, it wasn't too difficult to get correctly, unlike the first shortcut.
Taking the previous shortcut led Sonic into a park. Exiting the park leads to the next path into a 2D section. "Hitting a Jump Panel [1:34 mark], Sonic flies right onto a Horizontal Bar across the street" (Birlew 111). The Horizontal Bar allowed me to swing Sonic onto the higher path where I was able to skip the lengthy platforming section on the bottom path. After going through Dash Rings, I was required to "Jump immediately and Homing Attack balloons hanging midair and bounce from the resulting pop . . ." (Birlew 111). I was barely able to achieve this, as instead of Homing Attacking the balloon, Sonic sort of crashed through them at the 1:39 mark due to his high momentum. However, the end result was still the same as what the book stated, so it all worked out in the end.
The last set of shortcuts I performed were at the 1:41 mark, and the 1:51 mark. The first of the three required me to "Jump and Homing Attack two Mono Beetles in succession,and then spin dash after the second to reach a rooftop. From there, you can jump to a balcony on the next building, which has a Jump Panel at the right end [occurred at the 1:45 mark]" (Birlew 112). The Jump Panel was able to propel Sonic into another Horizontal Bar, which led to the second shortcut I mentioned earlier. This shortcut occurs after a small platforming section, where I had to "Spin Jump onto the grind rail while midair. Jump before reaching the end of the first rail and spin jump onto the next . . ." (Birlew 112).
After the last shortcut, I did make a little mistake at the 1:59 mark where I ended up boosting into the wall instead of through the small opening, but it didn't severely impact my time. The final section of the stage is a set piece where Sonic is being chased by a truck, so there are no more shortcuts. My ending time for the stage was 2 minutes 35.15 seconds. So taking most of the shortcuts that the book mentioned saved a total of 22.47 seconds.
Conclusion
To end this blog post, doing the shortcuts in City Escape was overall was a little bit easier than Chemical Plant. While I did end up giving up on doing the first shortcut, the rest were more focused on platforming and making sure I stayed on the high path rather than the reflexes Chemical Plant required when taking certain alternate pathways.
What did you feel about the speedrun on this stage? Do you think I should've given up on the first shortcut, or do you think I should've persisted? Let me know down in the comments below along with any other statements or questions you have!
Birlew, Dan. “City Escape: Act 2.” Sonic Generations, DK/BradyGames, 2011, pp. 108–112.
Art of Drawing
Drawing: Blog 3

Recently I’ve
been trying out different styles of art. For this blog I’ve specifically focused
on abstract and perspective styles. For abstract I drew a tree trunk by using rings
which is a type of shading. According to the author, the three-dimensional
rings create volume for cylindrical objects. As I drew my tree trunk I found that
the more of a C shape I made the more volume it gave the tree trunk. I also found
that outlining the shape of the tree helped make it easier to make the rings
because I had an outline for how I wanted the tree trunk to look like and I could
just follow it while I made the rings. Personally, I think abstract is a lot more
interesting because it doesn’t have to look a certain way and you can just draw
it however you want.

The next
style I practiced was perspective. Perspective is also useful for expressing depth
which makes the drawing three-dimensional. To show depth I used ‘bodies in the
distance’ which is “… reducing the size of the body’s image. As the distance increases,
the object becomes smaller until it becomes a shadow abstraction…” (Sanmiguel
163). I drew trees to practice decreasing the size in the distance. I thought
that it was hard to show a shadow in the back as the size decreased because I couldn’t
really figure out how to do that although I think starting from the trees
closest to the front is easier to do because as you go along you can just make
them smaller. I also think that having a building or something other than trees
help shows distance as well because it’s smaller and it shows that it’s farther
away. What do you think could help show distance increasing in a drawing?
Subscribe to:
Posts (Atom)
-
 Drawing: Blog 4 While drawing you have to accept that what you draw doesn’t need to be perfect. As I’ve been learning new techniques I...
-
 Learning to Play the Piano: Continuing my piano learning journey, my book Piano for everyone by Margaret Ann Martin, describes triplets ...
-
 FOOD PHOTOGRAPHY: BLOG 1 Taking photos capture moments important to us and like capturing pictures of landscapes and people require a ski...